Finding any technique that’s simpler, more effective, and less expensive than what’s been used before is satisfying. This is true for the production of transplants, and soil blocks meet these criteria. The Dutch have been developing this technique for more than 100 years, but the human history of growing plants in cubes of soil goes back 2,000 years or more. The story of how Aztec horticulturists of the chinampas of Xochimilco, Mexico, used cubes of rich mud to grow seedlings makes fascinating reading. A related technique is the old market gardener’s practice of using 4- to 5-inch (10- to 13-centimeter) cubes of partially decomposed inverted sod for growing melon and cucumber transplants.
How Soil Blocks Work
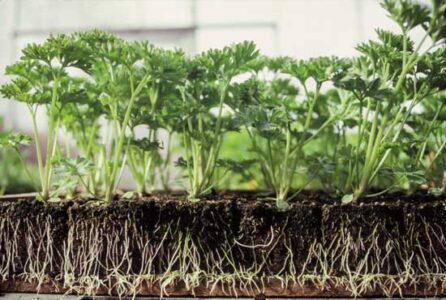
A soil block is pretty much what the name implies — a block made out of lightly compressed potting soil. It serves as both the container and the growing medium for a transplant seedling. The blocks are composed entirely of potting soil and have no walls as such. Because they’re pressed out by a form rather than filled into a form, air spaces provide the walls. Instead of the roots circling, as they do upon reaching the wall of a container, they fill the block to the edges and wait. The air spaces between the blocks and the slight wall glazing caused by the block form keep the roots from growing from one block to another. The edge roots remain poised for rapid outward growth. When you transplant the seedling to the field, it quickly becomes established. If you keep the plants too long in the blocks, however, the roots do extend into neighboring blocks, so the plants should be transplanted before this happens.
Despite being no more than a cube of growing medium, a soil block is not fragile. When first made, the fibrous nature of the moist ingredients binds it together. Once seeded, the roots of the young plant quickly fill the block and ensure its stability even when handled roughly. Soil blocks are the answer for a farm-produced seedling system that costs no more than the soil of which it’s composed.
The Soil-Block Maker
The key to this system is the tool for making soil blocks — the soil-block maker or blocker. Basically, it’s an ejection mold that forms self-contained cubes out of a growing medium. Both hand and machine models are available. For small-scale production, hand-operated models are perfectly adequate. Motorized block-making machines have a capacity of more than 10,000 blocks per hour, but they’re overscaled for the small vegetable farm.
There are two features to understand about the blocker in order to appreciate the versatility of soil blocks: the size of the block form and the size and shape of the center pin.
Forms are available to make 3/4-inch (2-centimeter) blocks (the mini-blocker), 1-1/2-inch (4-centimeter) blocks, 2-inch (5-centimeter) blocks, 3-inch (7-1/2-centimeter) blocks, and 4-inch (10-centimeter) blocks (the maxi-blocker). The block shape is cubic rather than tapered. Horticultural researchers have found a cubic shape to be superior to the tapered-plug shape for the root growth of seedlings.
Two factors influence choice of block size: the type of plant and the length of the intended growing period prior to transplanting. For example, you’d use a larger block for early sowings or where planting outside is likely to be delayed. A smaller block would suffice for short-duration propagation in summer and fall. You’d only use the mini-block as a germination block for starting seedlings.
The pin is the object mounted in the center of the top press-form plate. The standard seed pin is a small button that makes an indentation for the seed in the top of the soil block. This pin is suitable for crops with seeds the size of lettuce, cabbage, onion, or tomato seeds. Other pin types are dowel- or cube-shaped. I use the cubic pin for melons, squash, corn, peas, beans, and any other seeds of those dimensions. You can also use cubic pins so you can place a seedling growing in a smaller block into a larger block; the pin makes a cubic hole in the top of the block into which the smaller block is placed. The different types of pins are easily interchangeable. A long dowel pin makes a deeper hole into which you can insert cuttings.
Blocking Systems
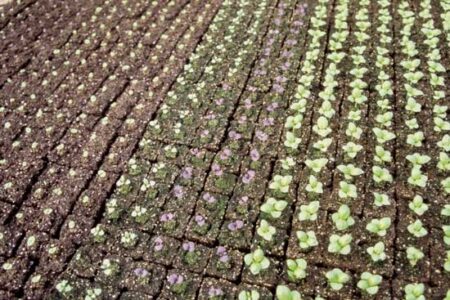
You can use the 3/4-inch (2-centimeter) block made with the mini-blocker for starting seeds. With this small block, you can germinate enormous quantities of modular seedlings on a heating pad or in a germination chamber. This is especially useful for seeds that take a long time to germinate, because you use minimal space in the process.
Mini-blocks are effective because you can handle them as soon as you want to pot on the seedlings. The oft-repeated admonition to wait until the first true leaves appear before transplanting is wrong. Specific investigations by W. J. C. Lawrence, one of the early potting-soil researchers, have shown that the sooner young seedlings are potted on, the better is their eventual growth.

You can use the 1-1/2-inch (4-centimeter) block for short-duration transplants of standard crops, such as lettuce, brassicas, beets, fennel, etc. When fitted with a long dowel pin, it makes an excellent block for rooting cuttings.
The 2-inch (5-centimeter) block is the standard for longer-duration transplants. When fitted with the 3/4-inch cubic pin, you can use it for germinating bean, pea, corn, or squash seeds, and for the initial potting on of crops started in mini-blocks.
The 3-inch (7-1/2-centimeter) block fitted with a 3/4-inch (2-centimeter) cubic pin offers the option to germinate many different field crops (squash, cucumber, melon) when greenhouse space isn’t critical. It’s also an ideal size for potting on asparagus seedlings started in mini-blocks.
The 4-inch (10-centimeter) block fitted with a 1-1/2- or 2-inch (4- or 5-centimeter) cubic pin can be the final home of artichoke, eggplant, pepper, and tomato seedlings. Because of its cubic shape, it has the same soil volume as a 6-inch (15-centimeter) pot.
Soil Blocker Recipes
When you grow transplants, whether in blocks or pots, their rooting area is limited. Therefore, the soil in which they grow must be specially formulated to compensate for these restricted conditions. For soil blocks, this special growing medium is called a “blocking mix.” The composition of a blocking mix differs from ordinary potting soil because of the unique requirements of block making. A blocking mix needs extra fibrous material to withstand being watered to a paste consistency and then formed into blocks. Unmodified garden soil treated this way would become hard and impenetrable. A blocking mix also needs good water-holding ability because the blocks aren’t enclosed by a container. The bulk ingredients for blocking mixes are peat, sand, soil, and compost. Store-bought mixes can also work, but most will contain chemical additives not allowed by many organic certification programs. If you can find a commercial peat-and-perlite mix with no additives, you can supplement it with soil, compost, and extra ingredients, such as lime, blood meal, colloidal phosphate, and greensand.
Soil Blocker Mix Recipe
A standard 10-quart bucket is the unit of measurement for the bulk ingredients. A standard cup measure is used for the supplementary ingredients. This recipe makes approximately 2 bushels of mix.
Ingredients:
- 3 buckets brown peat
- 1/2 cup (120 milliliters) lime
- 2 buckets coarse sand or perlite
- 3 cups (720 milliliters) base fertilizer
- 1 bucket soil
- 2 buckets compost
Directions:
First, combine the peat with the lime, because that’s the most acidic ingredient. Then, add the sand or perlite. Mix in the base fertilizer next. By incorporating the dry supplemental ingredients with the peat in this manner, they’ll be distributed as uniformly as possible throughout the medium. Add the soil and compost, and mix completely a final time.
To use this recipe for larger quantities, think of it measured in “units.” The unit can be any size, as long as you maintain the ratio between the bulk and the supplementary ingredients. A unit formula would call for:
- 30 units brown peat
- 1/8 unit lime
- 20 units coarse sand or perlite
- 3/4 unit base fertilizer
- 10 units soil
- 20 units compost
Mini-Soil Block Recipe
Use this blend for germinating seeds in mini-blocks. Seeds germinate better in a “low-octane” mix, without any blood meal added. Finely screen the peat and compost through a 1/4-inch (0.6-centimeter) mesh before adding them to the mix.
Ingredients:
- 16 units or 4 gallons (15 liters) brown peat
- 1/8 unit or 1/2 cup (120 milliliters) colloidal phosphate
- 1/8 unit or 1/2 cup (120 milliliters) greensand
- 4 units or 1 gallon (3.8 liters) well-decomposed compost
Note: If greensand is unavailable, leave it out; do not substitute a dried seaweed product in this mix.
Moistening the Mix
You must add water to wet the mix to blocking consistency. The amount of water varies depending on the initial moisture content of the ingredients. On average, to achieve a consistency wet enough for proper block making, the ratio of water to mix by volume will be about one part water to every three parts mix, or a little over 2-1/2 gallons (9-1/2 liters) of water to every cubic foot (0.09 square meter) of mix.
For successful block making, be sure to use a mix that’s wet enough. Since this will be much wetter than potting mixes used for pots or flats, it takes some getting used to. The most common mistake in block making is trying to make blocks from a mix that’s too dry. The need to thoroughly moisten the mix is the reason the mix requires a high percentage of peat, which gives it the necessary resiliency.
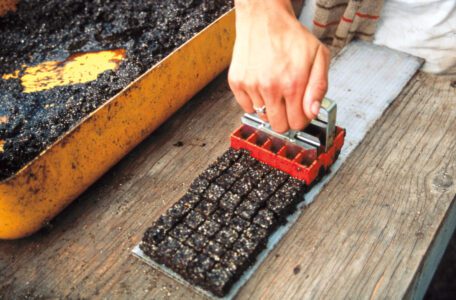
Making Soil Blocks
Spread the wet mix on a hard surface at a depth thicker than the soil-block maker you intend to use. Fill the soil-block maker by pressing it into the mix with a quick push and a twisting motion to seat the material. Lift the blocker, scrape off any excess mix against the edge of a board, and place the blocker on a three-sided flat, bread tray, plastic sheet, or concrete floor. You eject the blocks by pressing on the spring-loaded handle until a little moisture oozes out, and then raising the sides of the form in a smooth, even motion. After each use, dip the blocker in water to rinse it. A surprising rate of block production (one grower claims up to 5,000 per hour using the 1 1/2-inch [4-centimeter] commercial-scale model) will result with practice.

Seeding Single-Plant Blocks
The blockers form each block with an indentation in the top to receive the seed. Sow one seed per block. There’s a temptation to use two (just to be on the safe side), but that’s not necessary. Germination is excellent in soil blocks because of the ease with which you can maintain ideal moisture and temperature. The few seeds that don’t germinate are much less of a problem than the labor to thin all those that do. Of course, if the seed is of questionable vitality, it’s worth planting more than one seed per block, but, obviously, it pays to get good seed to begin with.

For large seeds, such as cucumber, melon, and squash, you can place the seeds with your fingers. Finger-seeding is also possible for small seeds that have been pelleted, although pelleted seeds aren’t easily available in most cultivars, and naked seeds are more commonly used. You can most accurately handle small seeds by using a small thin stick, a sharpened dowel, a toothpick, or a similar pointed implement. Spread the seeds on a dish, moisten the tip of the stick in water, and touch it to one seed. The seed will adhere to the tip so you can move it to the seed indentation in the top of a block and deposit it. The solid, moist block has more friction than the tip of the stick, so the seed will stay on the block. Another technique is to crease one side of a seed packet or use any other V-shaped container, and tap out the seeds by striking the container with your fingers or a small stick.
I never cover the seeds I’ve planted in mini-blocks. Oxygen is important for high-percentage seed germination. Even a thin covering of soil or potting mix can lower the percentage of germination. This is important for all small flower seeds also. If the sowing instructions suggest the seeds need darkness to germinate, I cover the flats temporarily with a sheet of black plastic. I keep the moisture level high during the germination period by misting frequently with a fine spray of water. For the majority of crops in the larger blocks, I get sturdier seedlings if I cover the seeds. I do that by sprinkling a thin layer of potting soil over the top of the blocks.

Temperature, in addition to oxygen and moisture, is key to a high percentage of seed germination. Use a thermostatically controlled soil heating pad under your blocks to maintain ideal warmth. Try using a remote thermostatic probe to check the temperature of the potting soil or in the gap between the soil blocks. I find that 70 to 75 degrees Fahrenheit (21 to 24 degrees Celsius) is ideal for most crops. However, 80 to 85 degrees Fahrenheit (27 to 30 degrees Celsius) seems ideal for asparagus, cucumbers, tomatoes, eggplants, melons, peppers, and squash.
Soil Block Benefits
The best thing about the soil-block system is that everything you can do in small pots, paks, trays, or plugs can be done in blocks, and blocks can be made to accommodate any need. There’s no plastic pot expense to the grower, the customer, or the environment. With roots not mangled from outgrowing their container, seedlings are ready to reestablish themselves when they hit garden soil, cutting down on transplant shock. In short, soil blocks constitute the best system I’ve yet found for growing seedlings.
This article is adapted from Eliot Coleman’s book The New Organic Grower, 30th Anniversary Edition(Chelsea Green Publishing, September 2018) and is reprinted with permission from the publisher.

Soil Blocker Set
Get everything you need to start making your own soil blocks! This kit includes: the Mini 4 Soil Blocker, the Micro 20 Soil Blocker, and Cubic Inserts for the Mini 4 Soil Blocker. Ladbrooke has created some of the most eco-friendly tools that will provide a high rate of germination and easy blooming.
This item is available at the MOTHER EARTH NEWS Store


